Want to just skip to looking at code?
Git repo on GitHub here: urbanspr1nter/intel-gpu-fine-tune: Fine tuning example of Qwen3-0.6B on an Intel GPU using xpu
Our dual Arc B580 system is really fast for running small language models. We can get lots of tokens generated for sub-1B models. But what would we actually want to use these smaller models for?
Sub-1B models (e.g., Qwen3-0.6B, gemma-3-270m-it, llama3.2-1b, etc.) are meant to run on lower-power, lower-end devices to help solve niche problems. One example could be an edge device in agriculture -- you can deploy mini PCs to monitor crops, etc.
However, in order for these models to be remotely useful, it is helpful to perform some fine-tuning for the specific domain where you intend to deploy the model. Fine-tuning allows you to take a small language model performing a task at sub-par competency to becoming very competent with a good dataset.
Here is a preview of what we will be doing. Fine-tuning a a very small language model at only 1.2 GB at FP16 weights and making really good at fixing JSON structure and invalid content. The training data set was only 844 examples and fine-tuned over an integrated Intel GPU! 🤯. No big NVIDIA graphics here!

There are a lot of resources out there to help get started fine-tuning on NVIDIA or even AMD GPUs, but I haven't found many for Intel.
I hope this post will serve as the resource to get started fine-tuning models on Intel GPUs. 🥳
Because the field of AI is changing rapidly, this guide, along with others I write about AI, will be a living document. So check back once in a while for updates!
What We'll Be Doing
- We will fine-tune the
Qwen3-0.6Bmodel on a problem represented by a dataset synthetically generated bygpt-oss-20b. - Dataset generation, fine-tuning, and testing will all leverage the Arc B580 GPUs.
- We will use the
trllibrary to fine-tune the model. - We will use a mix of
vllmandllama.cppto test the model. - We will write the code for dataset generation, evaluation, fine-tuning, and testing all from scratch.
In short, this guide is really not entirely focused on fine-tuning on Intel hardware specifically, but a guide in how to fine-tune a model which happens to just use Intel hardware. 😅
My Systems
I'll be fine-tuning this model twice on two systems to demonstrate iGPU and dGPU fine-tuning.
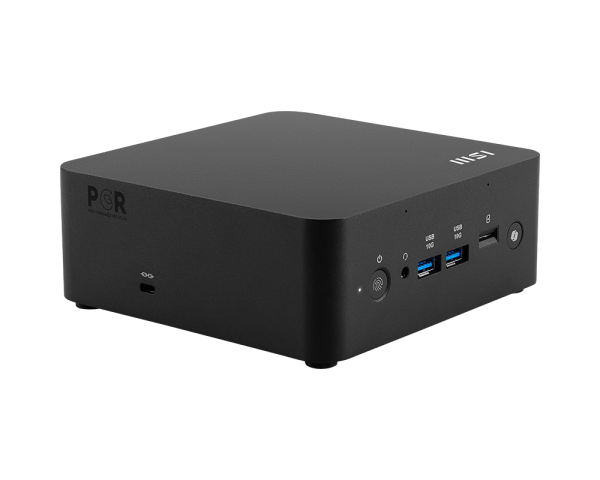
The iGPU system will be an MSI Cubi NUC AI+ 2MG with an Arc 140V. This is my favorite machine, haha. The Arc 140V allows us to have up to 16GB of VRAM, which is more than enough for the fine-tuning we will be doing today.
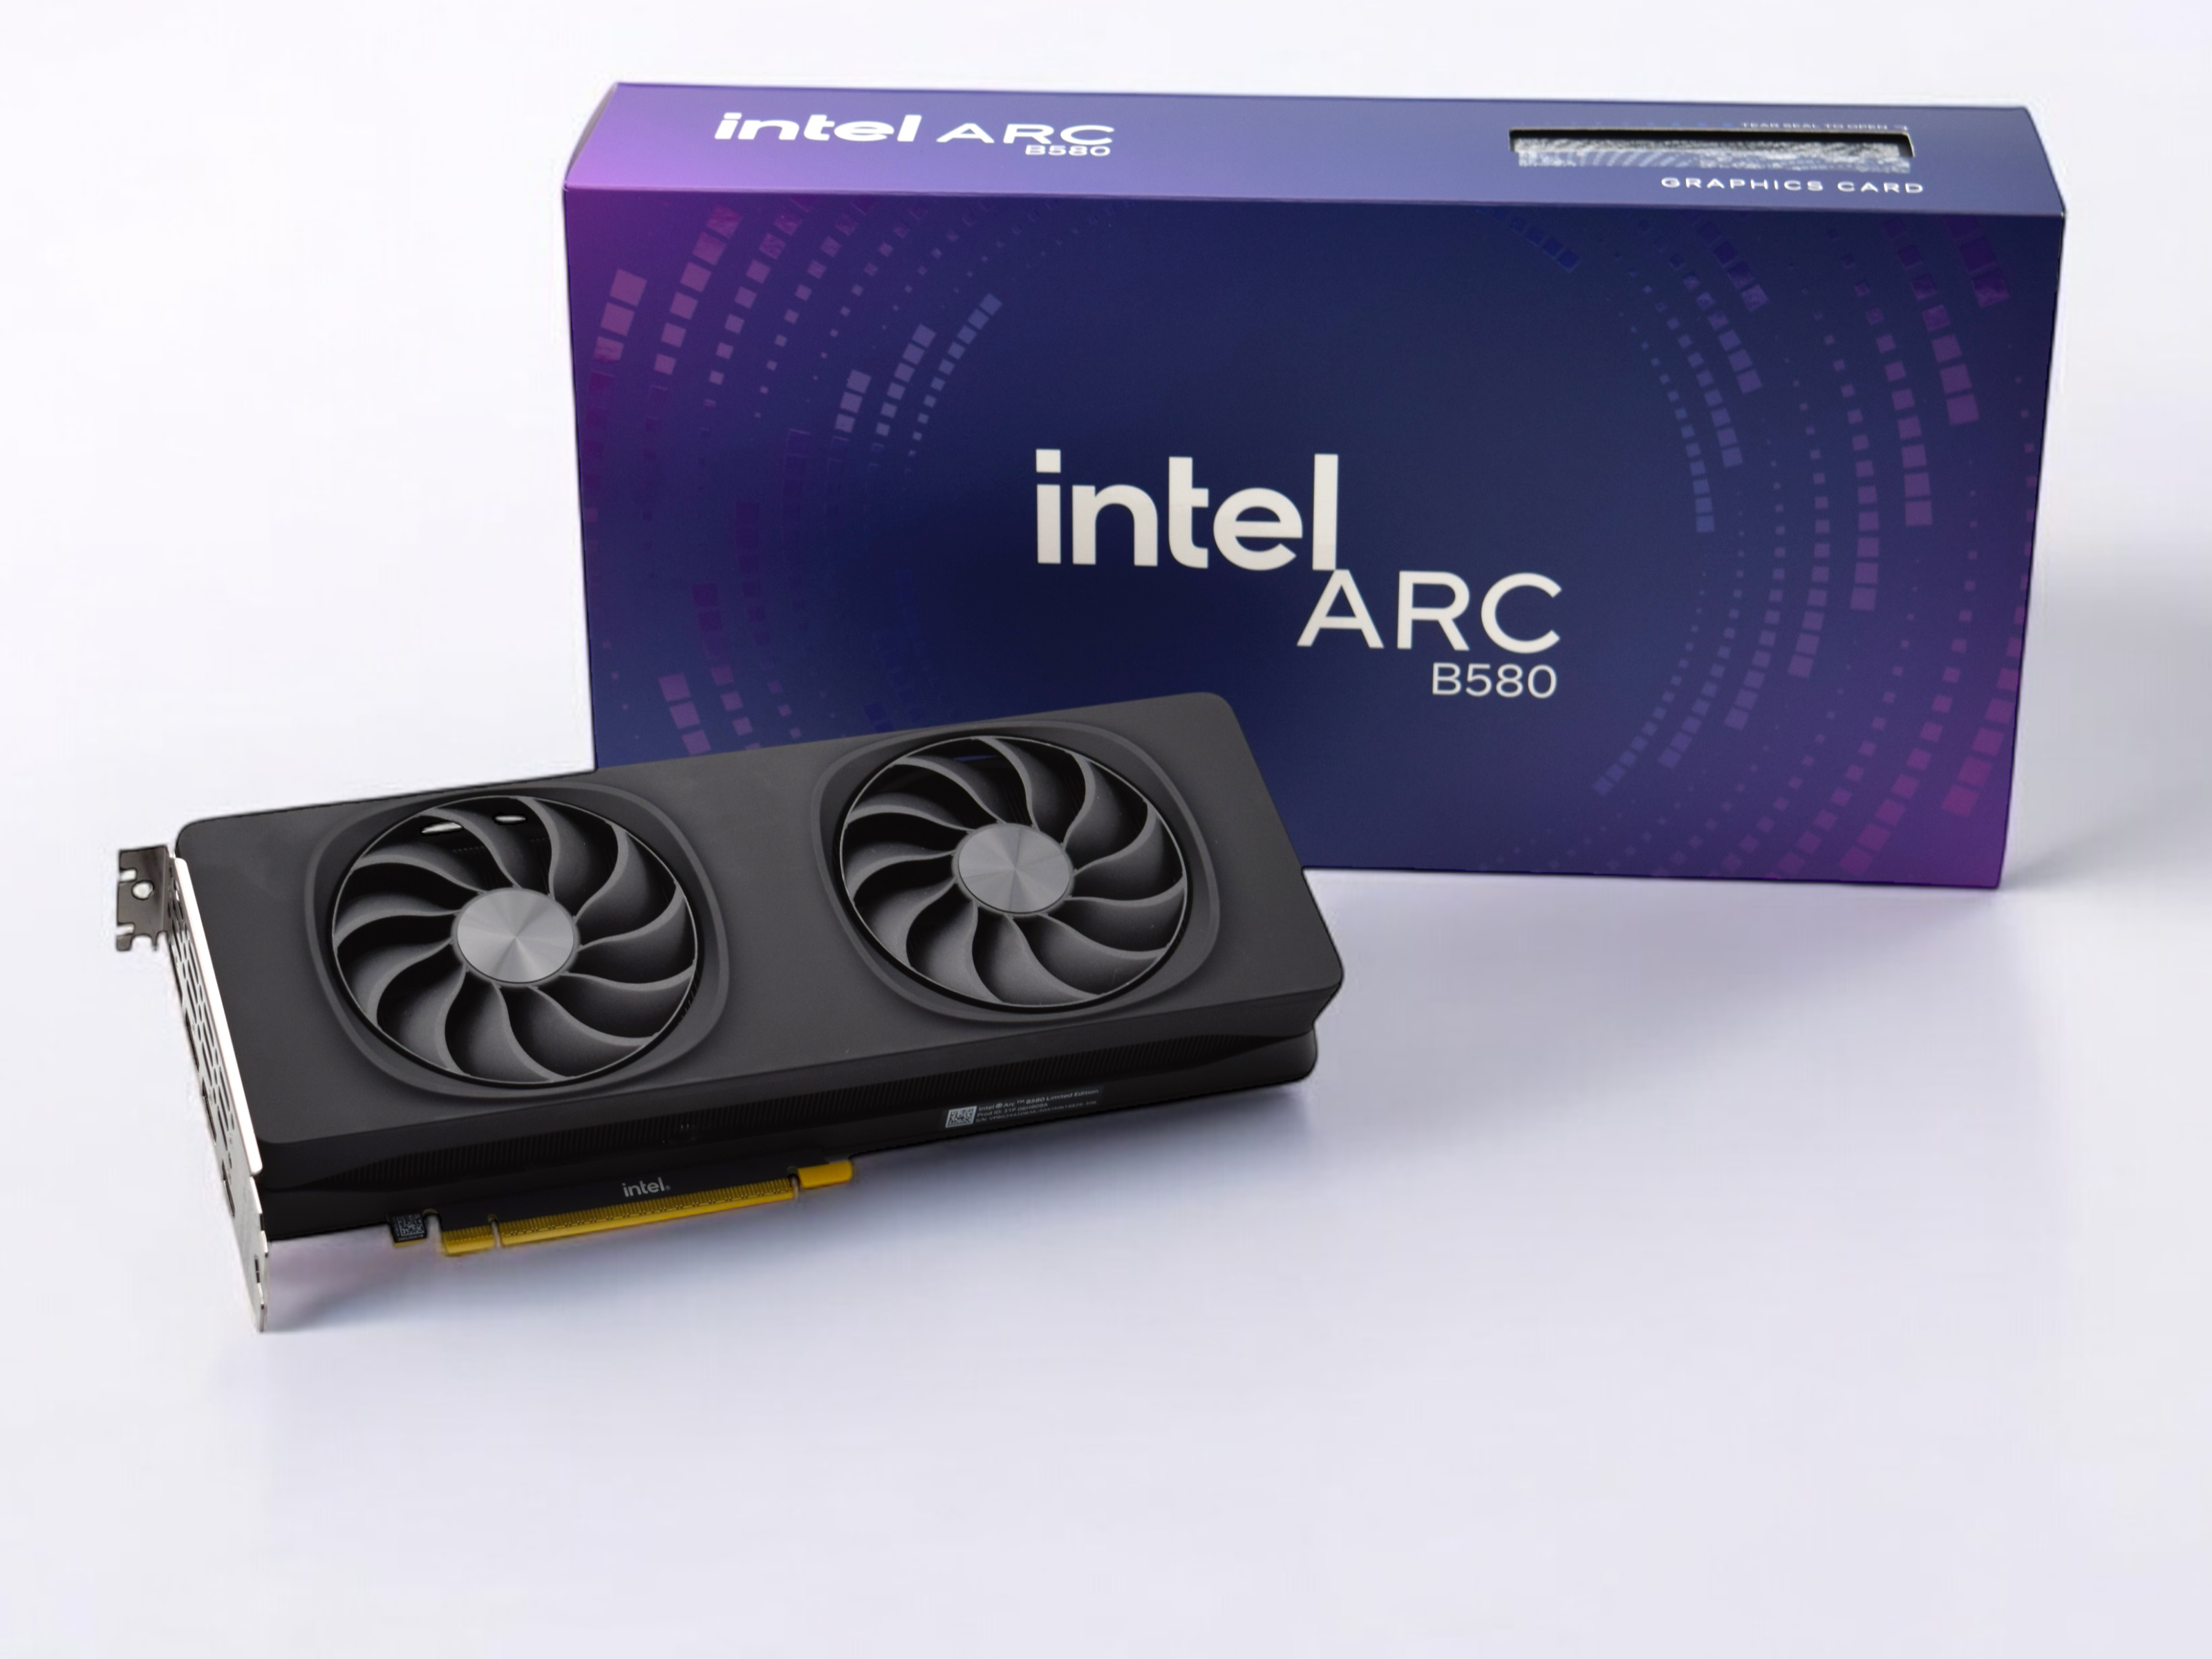
The dGPU system will be the same dual Intel Arc B580 system I built in the previous post. We'll generate data with two GPUs but will only be fine-tuning with a single Arc B580 GPU.
⚠️ I don't have an easy way to fine-tune with a multi-GPU setup yet. This may change in the future.
Prerequisites
Any computer with an Intel Arc GPU with at least 10GB of VRAM will work. This means you can use lower-end Arc GPUs like the 140V, 140T, and B570 for this.
I assume you have followed my other guide on getting the environment set up for your Arc-based system. But in summary, you'll need to have:
- Ubuntu Linux 24.04.3 LTS fully updated
- Intel client dGPU drivers installed
- Intel oneAPI base toolkit installed
- Virtual environment with
torch-2.9.1+xpuinstalled first, and specificallypytorch-triton-xpu==3.5.0 llama.cppto quickly serve the model on one GPU. You can clone the latest main branch and build.
If you find that you don't have enough VRAM, just adjust some hyper-parameters in the script that I will show you in a future section of this article.
Preparation
As with any project, it's good to stay organized and create a directory to hold all your stuff.
mkdir xpu-fine-tuning
cd xpu-fine-tuning
From here, you can initialize a new git repository with git init and even add a .gitignore. It's as simple as this if you have nodejs installed:
npx gitignore pythonOnce inside, you'll need to create the virtual environment, activate and start it. Then install all the necessary dependencies. Install torch-2.9.1+xpu and pytorch-triton-xpu first, as they have strict version requirements.
python3.12 -m venv .venv
source .venv/bin/activate
pip install setuptools
pip install torch torchvision torchaudio --index-url https://download.pytorch.org/whl/xpu
pip install --force-reinstall --index-url https://download.pytorch.org/whl/xpu "pytorch-triton-xpu==3.5.0"
pip install transformers trl
pip install -e .
It's a good idea to pip freeze so you don't have to remember so much.
pip freeze > requirements.txtIf you're already set up for git, then now is a good time to make the initial commit!
Problem Definition
For me, fine-tuning a model is like having to draw or paint a picture. I need inspiration. For personal software projects, inspiration comes easily when you have a problem to solve.
One problem I have is formatting and correcting content in invalid JSON so that I can use it downstream for things that accept valid JSON.
Tools like JSONLint, JSON Validator, and others provide a great linting and prettifying process to validate and turn unformatted JSON into formatted JSON. But if the content in your JSON is bad, then these tools fall a bit short in quickly getting valid JSON.
What if AI could not only give you back prettified JSON, but also correct invalid JSON caused by faulty content?
For example, let's say I'm in a rush, and I've somehow have messed up some JSON and done a bad copy and paste job:
{"hello": "bill", b: "great job
bill. you've got it!
"}
A small, fine-tuned LLM can fix everything about this invalid JSON and produce something like this:
{
  "hello": "bill",
  "b": "great job\nbill. you've got it!\n"
}
I actually have this problem more than I realize. 😅
Another more substantial example could be something like this:
{
  user: {
    id: 1234,
    name: "Roger",
    isActive: true,
    roles: [admin, "editor"],
    bio: "Loves JSON, especially the "tricky" parts.",
    lastLogin: 2025-12-30T18:00:00Z
  },
  metadata: {
    source: api_v2,
    retries: 2,
    notes: "Line 1
Line 2",
    extra: { region: us-west-2 }
  }
}
Lots of stuff wrong here. Keys aren't quoted. Content has characters that must be escaped, etc. You can also tell that one of the more common mistakes I tend to make is forgetting the \n character in multi-line content.
With a little training, the LLM can produce this:
{
  "user": {
    "id": 1234,
    "name": "Roger",
    "isActive": true,
    "roles": [
      "admin",
      "editor"
    ],
    "bio": "Loves JSON, especially the \"tricky\" parts.",
    "lastLogin": "2025-12-30T18:00:00Z"
  },
  "metadata": {
    "source": "api_v2",
    "retries": 2,
    "notes": "Line 1\nLine 2",
    "extra": {
      "region": "us-west-2"
    }
  }
}
Anyway, do we need a super strong and big language model for this? No! Absolutely not! In fact, the results was produced by Qwen3-0.6B, which is only a 600-million parameter model.
What Are We Fine-Tuning?
So this is what we are going to fine-tune today: Qwen3-0.6B for JSON formatting and fixing.
We will be using only a single Intel Arc B580 GPU with 12GB of VRAM for this example.
The end result is that we will have a handy model that we can run on lower-power edge devices like a cheap mini PC to host a JSON validator and cleaner.
I hope this will be fun for you in that you can have fun with small language models and also with nonconventional hardware such as the Arc series of GPUs.
Data, Data, Data
The first thing is to generate data. Usually, if I were on NVIDIA hardware, the training itself is straightforward, while the data gathering and evaluation process is the longest and most grueling part.
Since we're playing with unfamiliar hardware, the data process is actually the more pleasant of the two this time around.
Here is the plan:
- A prompt defines what a single example of our dataset will look like.
- Create a script to generate multiple examples. Do as much as possible. For a quick and easy demo, about 1,000 examples should be enough. (We can then split it to 900/50/50 as a train/evaluation/test split.)
- Create a script to evaluate the quality of the dataset. We will use LLM-as-a-judge to do the filtering. Let's keep only the ones that pass.
- If after evaluation the number of usable examples has decreased, go back and generate more. Evaluate again until you have about 1,000 or more in your dataset.
Data Generation
We'll synthetically generate data using gpt-oss-20b hosted by vllm on the dual Arc B580 GPUs!
The prompt is quite large—I spent some time refining it, but you can check it out here.
The script that we write basically:
- Creates an
openai.Clientinstance pointed at our localvllmserver. - Generates a single response message containing five different examples at a time with the Chat Completions API.
- Adds the examples to a running list.
- Repeats until we have enough total examples.
- Writes all examples as a
.jsonlfile.
Dataset Evaluation
It's best to use a different model to evaluate your dataset. For a cheap option, you can use the OpenAI API with gpt-5.2 to evaluate the data. You can even spin up llama.cpp, leverage CPU MoE offloading, and run Qwen3-30B-A3B on the dual B580 server to run your evals.
It doesn't matter how you do it as long as you don't use the same model to evaluate the data that was generated. That would be like grading your own test.
The prompt here will be different. It's about evaluating the data this time around, not generating it.
This eval script will:
- Create an
openai.Clientinstance that will persist and point to the appropriate evaluator endpoint. - Generate a single response message containing the evaluation results: quality and reasoning behind the decision.
- Add high-quality examples to the data we want to keep. Throw away the low-quality ones.
- Save the high-quality examples and repeat the generation and evaluation process as needed.
Splitting
We have a clean dataset now, but we need to split it into train, eval, and test data so that we can:
- Use the
test_datato judge the model before and after fine-tuning. - Train on
train_dataand evaluate oneval_dataperiodically.
Since we have about 1000 examples, we can split 900 for train_data, 50 for eval_data, and 50 for test_data.
This is just an example for a blog post. Experiment with your ratios to get a clearer signal on your training progress.
Fine-Tuning
Once you have your dataset ready, it's time to make another commit. You can use git-lfs if your dataset is large.
Current Abilities
Before we train, how well does the stock Qwen3-0.6B model do at simply answering "fix this JSON"? Note that I use /no_think here to get the quickest result possible. If I'm going to deploy this to a cheap mini PC or Raspberry Pi for inference, I need the lowest latency possible.
fix this JSON: {
  "message": "He said, "Hello!"",
  "path": "C:\Users\John"
}
The model outputs:
{
  "message": "Hello!",
  "path": "C:\\Users\\John"
}
Pretty good! This proves that the model is already quite capable.
How about something trickier?
fix this JSON: {"hello": "bill", b: "great job
bill. you've got it!
"}
And it results in:
{
  "hello": "bill",
  "b": "great job bill. you've got it!"
}
Ahhh NOT QUITE! ❌ So close! It missed the newline \n characters!
But in a way, that's good because then we have something to work on. I'd actually be less happy if we didn't have much to do for fine-tuning.
We can write a script to run through the entire test set to see the score:
- Load the test examples to a Python list.
- For each example, perform inference on the target model.
- Given the answer from the target model, compare it with the ground truth.
- +1 if the model's answer matches the ground truth (sorted keys)
- +0 if the model's answer does not match the ground truth
Record the score for the model before fine-tuning.
For inference, we'll set the temperature=0.01 to ensure almost deterministic generation. It makes sense since this model will be seen as a "tool".
Here's the code snippet for doing the comparison between the model's response and the ground truth. I would like to point out that for the comparison between the response of the model and the ground truth, I normalize the indentation of the JSON again. The formatting isn't as important to me as the accuracy of the content, so we do not count formatting due to spacing issues as something as penalty:
assistant_message = response.choices[0].message.content
try:
assistant_message = clean_message(assistant_message)
assistant_message_deserialized = json.loads(assistant_message)
assistant_message_prettified = json.dumps(assistant_message_deserialized, indent=2)
ground_truth = json.dumps(json.loads(example["fixed_json"]), indent=2)
if assistant_message_prettified == ground_truth:
score += 1
else:
print(f"{assistant_message} did not match ground truth: {ground_truth}")
except:
print(f"{assistant_message} did not match ground truth: {ground_truth}")For the full code, visit the source code on GitHub.
I had a little less than 1,000 examples, so my split isn't exactly what I specified. With my dataset of 46 examples for test_data, the base Qwen3-0.6B model scored 0.5435, or 54.35%. Not bad.
Training Script
Now we know the score we have to beat with our fine-tuned model. Let's fine-tune and get a better result.
The script is relatively straightforward. I'll walk you through the basics.
First, lets just import everything we need. json_fixer is our own module to convert our dataset examples to conversations to be used during training.
from datasets import Dataset
from json_fixer.convert_to_conversation import convert_to_conversation
import jsonlines
from peft import get_peft_model, LoraConfig
import torch
from transformers import AutoModelForCausalLM, AutoTokenizer
from trl import SFTTrainer, SFTConfig
Define some variables to be reused. These are pretty straightforward. The fine-tuned model will creatively be called Qwen3-0.6B-finetuned. You can adjust the path to the datasets for your system.
model_id = "unsloth/Qwen3-0.6B"
fine_tuned_model_id = "Qwen3-0.6B-finetuned"
train_dataset_path = "/home/rngo/code/intel-gpu-fine-tune/dataset/train_data.jsonl"
eval_dataset_path = "/home/rngo/code/intel-gpu-fine-tune/dataset/eval_data.jsonl"
Next we'll load up the train_data and eval_data and convert the individual JSON line to a format that the tokenizer can work with. This is what the convert_to_conversation helper does.
with jsonlines.open(train_dataset_path) as j:
train_dataset = list(j)
converted_train_dataset = [convert_to_conversation(example) for example in train_dataset]
with jsonlines.open(eval_dataset_path) as j:
eval_dataset = list(j)
converted_eval_dataset = [convert_to_conversation(example) for example in eval_dataset]
After the datasets are prepared, the model and tokenizer need to be initalized:
model = AutoModelForCausalLM.from_pretrained(
model_id,
torch_dtype=torch.bfloat16
)
# Enable gradient checkpointing compatability with LoRA
model.enable_input_require_grads()
tokenizer = AutoTokenizer.from_pretrained(
model_id
)
tokenizer.pad_token = tokenizer.eos_tokenNote:
- We need to enable gradient checkpointing for LoRA fine-tuning.
- We need to said the
pad_tokenfor the Qwen3 models.
Next, we'll define the LoRA configuration and add the untrained LoRA adapter to the model. This means reassigning the result of get_peft_model to model.
lora_config = LoraConfig(
r=training_configuration["lora"]["rank"],
lora_alpha=training_configuration["lora"]["alpha"],
lora_dropout=training_configuration["lora"]["dropout"],
bias="none",
target_modules=training_configuration["lora"]["target_modules"]
)
model = get_peft_model(model, lora_config)Although our dataset is now conversation-like, it is still not ready to be used by the model. We will need to format them in the way that Qwen3 truly understands every single example: applying its chat template to the example.
def formatting_prompts_func(examples):
conversations = examples["conversations"]
texts = [
tokenizer.apply_chat_template(
conversation,
tokenize=False,
add_generation_prompt=False
) for conversation in conversations
]
return {"text": texts}
train_dataset = Dataset.from_list(converted_train_dataset).map(
formatting_prompts_func,
batched=True
)
eval_dataset = Dataset.from_list(converted_eval_dataset).map(
formatting_prompts_func,
batched=True
)formatting_prompts_func will apply the Qwen3 chat template to every example in both train_data and eval_data. These are batched for efficiency.
Now, for what we have all been waiting for! Training! SFTTrainer is initialized and we use the train() method on the instance returned to go through the training loop:
trainer = SFTTrainer(
model=model,
processing_class=tokenizer,
train_dataset=train_dataset,
eval_dataset=eval_dataset,
args=SFTConfig(
dataset_text_field="text",
eval_accumulation_steps=training_configuration["train"]["eval_accumulation_steps"],
eval_strategy="steps",
eval_steps=training_configuration["train"]["eval_steps"],
gradient_accumulation_steps=training_configuration["train"]["gradient_accumulation_steps"],
# Use this to save some VRAM - instead of saving all the activations, we will recompute dynamically.
gradient_checkpointing=True,
# Do not use reentrant way of gradient checkpointing.
gradient_checkpointing_kwargs={"use_reentrant": False},
learning_rate=training_configuration["train"]["learning_rate"],
logging_steps=training_configuration["train"]["logging_steps"],
lr_scheduler_type=training_configuration["train"]["learning_rate_scheduler_type"],
max_length=training_configuration["train"]["max_length"],
num_train_epochs=training_configuration["train"]["num_train_epochs"],
optim="adamw_torch",
output_dir=training_configuration["train"]["output_dir"],
per_device_eval_batch_size=training_configuration["train"]["per_device_eval_batch_size"],
per_device_train_batch_size=training_configuration["train"]["per_device_train_batch_size"],
save_steps=training_configuration["train"]["save_steps"],
save_strategy="steps",
warmup_ratio=training_configuration["train"]["warmup_ratio"],
weight_decay=0.01,
# save some more VRAM
prediction_loss_only=True
)
)
trainer.train()In summary, our main training parameters are listed here as a review before we start training:
{
  "lora": {
    "rank": 32,
    "alpha": 32,
    "dropout": 0.05,
    "target_modules": [
      "q_proj",
      "k_proj",
      "v_proj",
      "o_proj",
      "gate_proj",
      "up_proj",
      "down_proj"
    ]
  },
  "train": {
    "eval_accumulation_steps": 1,
    "eval_steps": 100,
    "gradient_accumulation_steps": 4,
    "learning_rate": 2.5e-5,
    "learning_rate_scheduler_type": "cosine",
    "logging_steps": 4,
    "max_length": 2048,
    "num_train_epochs": 8,
    "output_dir": "checkpoints",
    "per_device_eval_batch_size": 1,
    "per_device_train_batch_size": 1,
    "save_steps": 100,
    "warmup_ratio": 0.05
  }
}
Few things to note here:
- We train all the linear layers. LoRA rank is 32 and alpha is 32 deliberately as the model is already quite skilled at fixing JSON.
- A small dropout is defined (0.05) for regularization to prevent the model from memorizing the training data towards later epochs.
- The B580 only has 12 GB VRAM. Turns out, to train this. model in 16-bit with our current dataset, we will need a little over 11 GB VRAM. Because of this our train and eval batch size must be 1.
- We set gradient accumulation steps to 4 to simulate an effective batch size of 4 since our per device batch size is 1.
- Our max sequence length to train is 2048 tokens. I believe the dataset itself doesn't have examples that large, but it is good to have in case it is the case that we have really large payloads.
- We will train for 8 epochs with a learning rate of 2.5e-5 and a cosine learning rate scheduler type. We'll evaluate every 100 steps and also save checkpoints at every 100 steps.
When our model is done training, we will save the LoRA adapters, merge it to the base model and save the new model and tokenizer. This will be ready for inference:
# Save LoRA adapters
model.save_pretrained(fine_tuned_model_id)
# merge LoRA adapters
merged_model = model.merge_and_unload()
# save the full merged model
merged_model.save_pretrained(fine_tuned_model_id)
tokenizer.save_pretrained(fine_tuned_model_id)Now, let's start fine-tuning:
python train.pyMonitor the device using nvtop if you'd like.
Things to look out for:
- VRAM usage
- If the eval loss is diverging away from the train loss, then consider early stopping.
- Adjust hyper parameters as needed, but always run
model_eval.pyscript to run test data against the fine-tuned model to understand if there is room for improvement.
Testing the Fine-Tuned Model
Once the training is done, we can serve our model with vllm and run the script to perform inference on our test dataset again with the new model.
For my fine-tuned model, I now get the following score: 0.8697 or 86.97% of the examples within the test dataset correct. That's a substantial improvement!
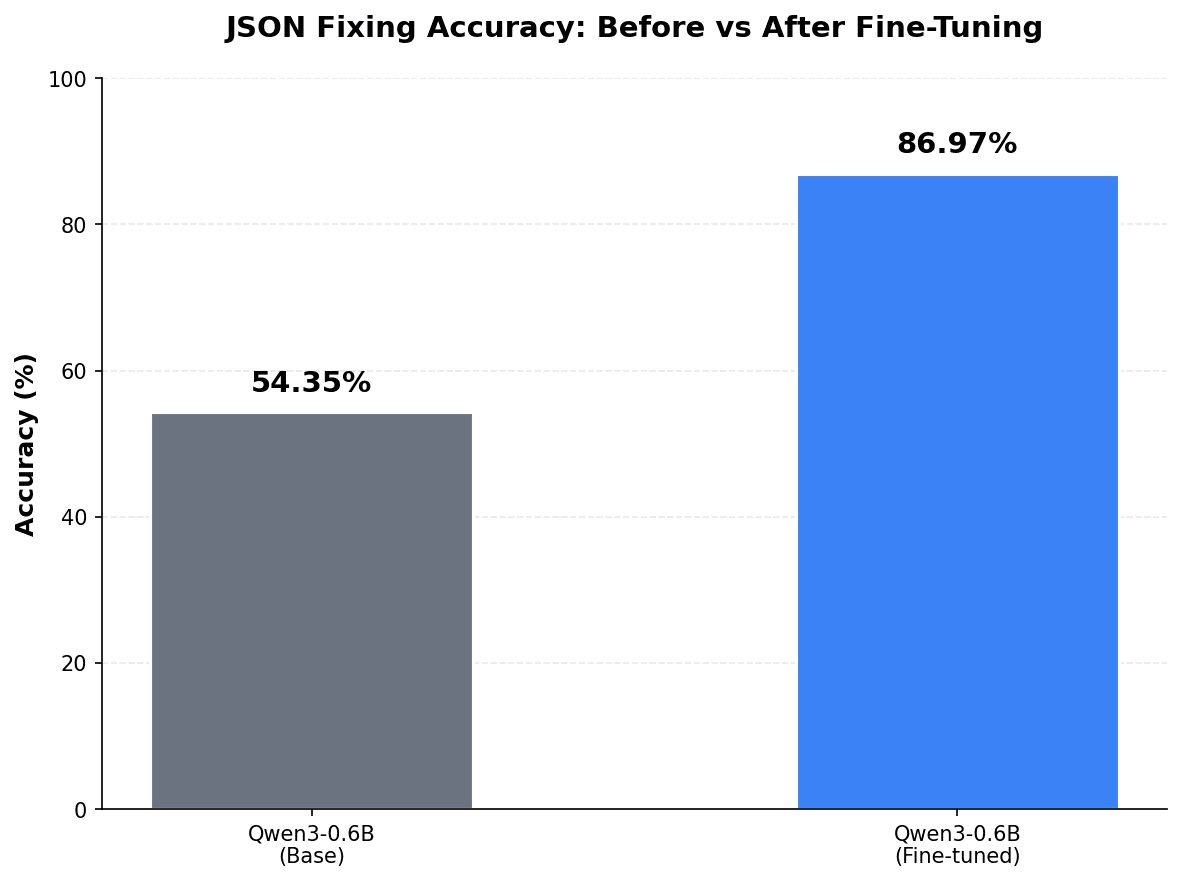
| Model | Score |
|---|---|
| Qwen3-0.6B | 54.35% |
| Qwen3-0.6B-finetuned | 86.97% 🏆 |
How would we improve this further? A dataset of approximately 1,000 examples is pretty small. We can always increase the number of examples to get a better model. We have all our scripts written, and it would be easy to do.
But let's really test our model as a user. We can fire up our trusty web chat client and see how accurate results are and also how fast we can generate.
Here's an example input:
fix this JSON: {
  id: 771,
  "title": "Weekly sync notes",
  "owner": roger,
  "status": done,
  "agenda": ["updates",, "risks", "next steps",],
  "notes": "We said we'll ship by Friday — but I’m not 100% sure.
Action item: ask Qian about the code changes."
}
And the result is:
{
  "id": 771,
  "title": "Weekly sync notes",
  "owner": "roger",
  "status": "done",
  "agenda": [
    "updates",
    "risks",
    "next steps"
  ],
  "notes": "We said we'll ship by Friday — but I’m not 100% sure.\nAction item: ask Qian about the code changes."
}
That makes me happy. We got exactly the result we were expecting... Clean, formatted JSON.
But how fast did we do with the dual B580s running inference on our fine-tuned Qwen3-0.6B model? 🤔
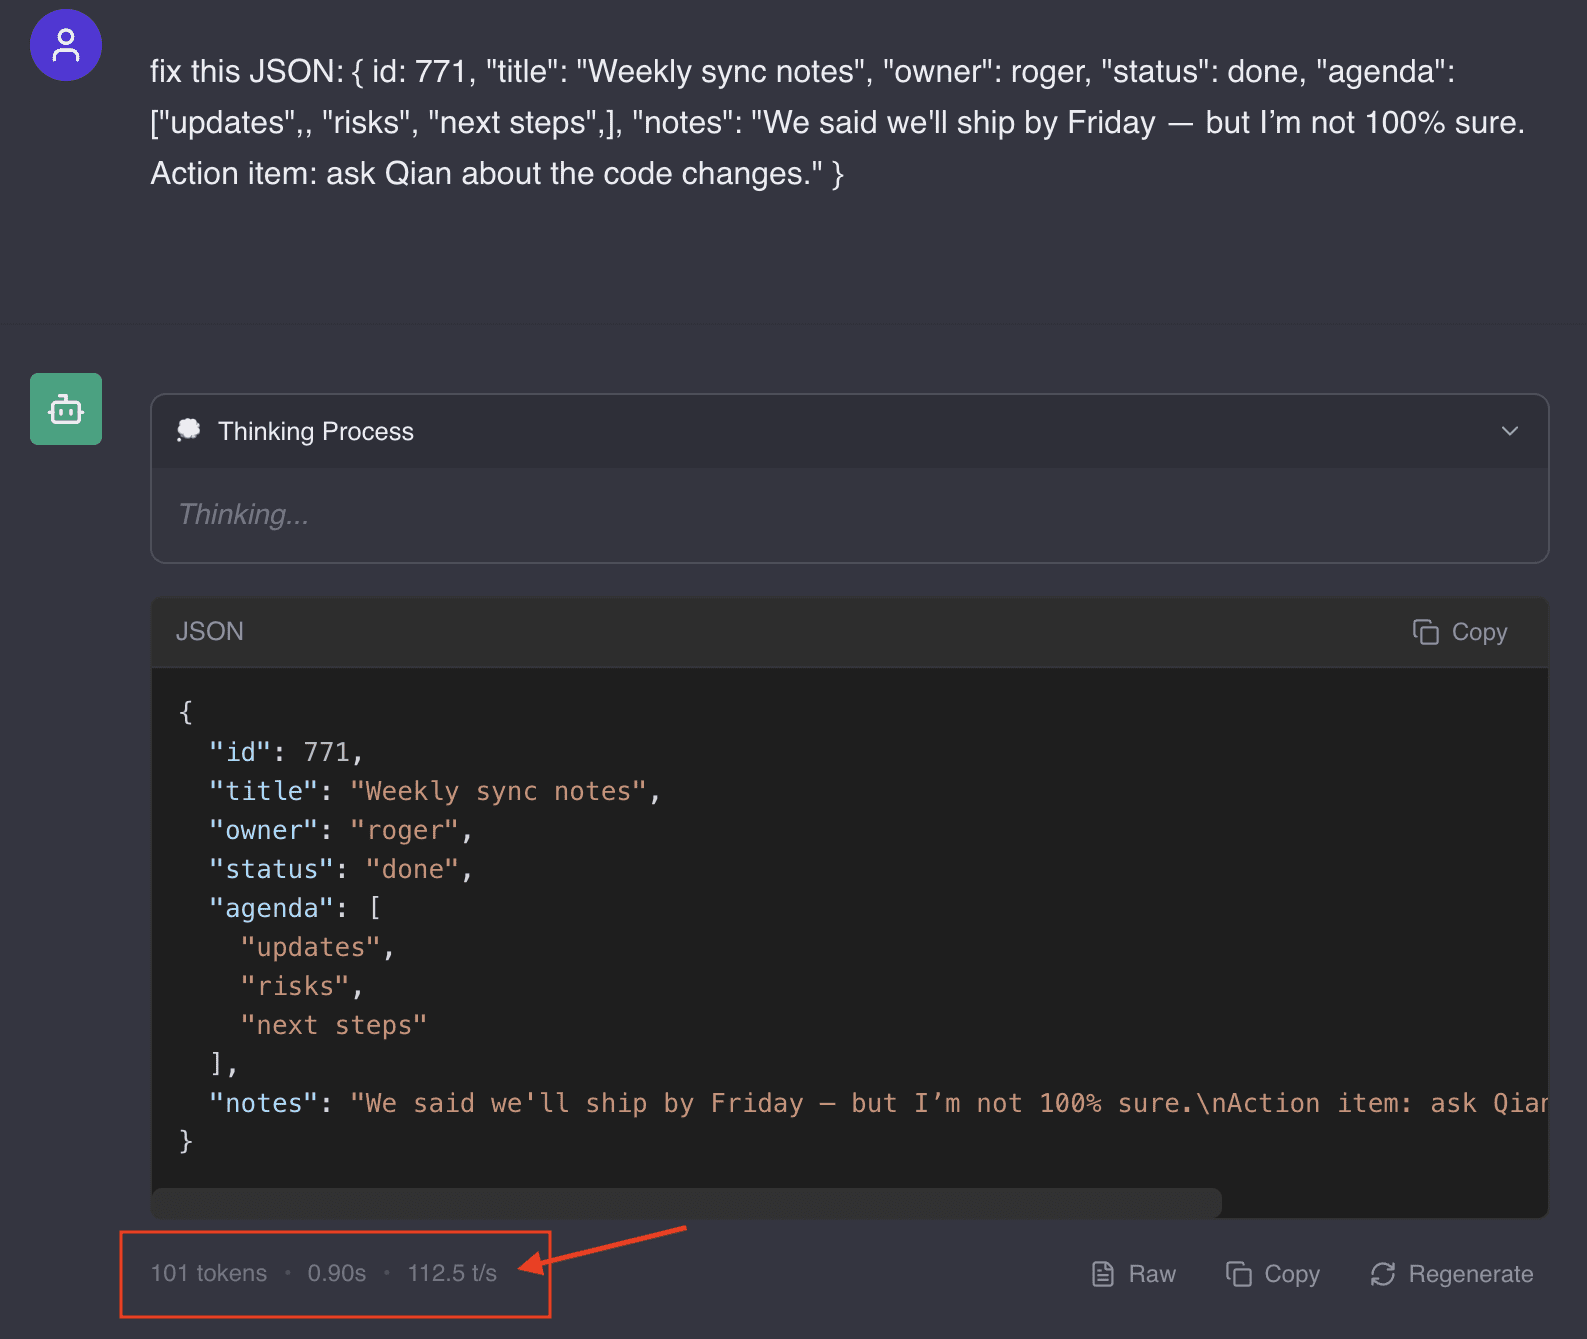
112.5 tokens/s - that is remarkably fast for the same type of configuration we had in vllm before with --tensor-parallel-size 2.
But since our model can fit entirely on a single GPU, we can try a tweak and change to: --tensor-parallel-size 1 and include --data-parallel-size 2. By serving the model on both GPUs but each having a copy, we can achieve faster throughput of 134.0 tokens/s on the B580 GPUs.

Fine-Tuning on the Arc 140V
If we can fine-tune on the Arc B580s, we've technically mastered our software stack. Why not see if we can fine-tune on a mini PC with an integrated Intel iGPU such as the Arc 140V?
How fast can we complete a fine-tune with LoRA? Is a mini PC viable as a platform for learning AI?
Intel and all these mini PC manufacturers have been slapping "AI" all over these machines. I wonder if there was a real intention behind that. Inference seems to be generally acceptable with small language models on these things... And we do have the means, technically, to fine-tune a small model.
Let's put it this way: if you or I were a student wanting to learn more about AI—inference, fine-tuning, training, etc.—and had to buy a computer to do that, what's the first type of machine you can think of? It's probably going to be some huge workstation with a very expensive NVIDIA GPU.
Does it have to be? What if a student finds out that AI isn't something they're that interested in after all? All that money invested is gone! The risk could be high!
Of course, I'm being overly dramatic, but I want to set the stage.
What if the alternative is to get one of those Intel AI-based mini PCs for less than $1,000? At worst, a student will have a machine they can take back home during breaks and do some light gaming on it. :D
Anyway, this part is straightforward. All we want to know is whether training on a mini PC with an integrated iGPU is going to be painful or not. If it takes us 13 minutes to train our 0.6B model with a single B580, how bad will it be with an iGPU like the 140V?
We already know we won't have a VRAM problem at all. My mini PC has 32GB of total system RAM, so 16GB is allocated to the iGPU. This is already more than what a B580 has (12GB VRAM).
Fine-Tune
All I have to do now is clone the repository, create the virtual environment, and install the dependencies. Set the appropriate training configuration if necessary and just run:
python train.py
Wow! It's only going to take a little over 36 minutes!

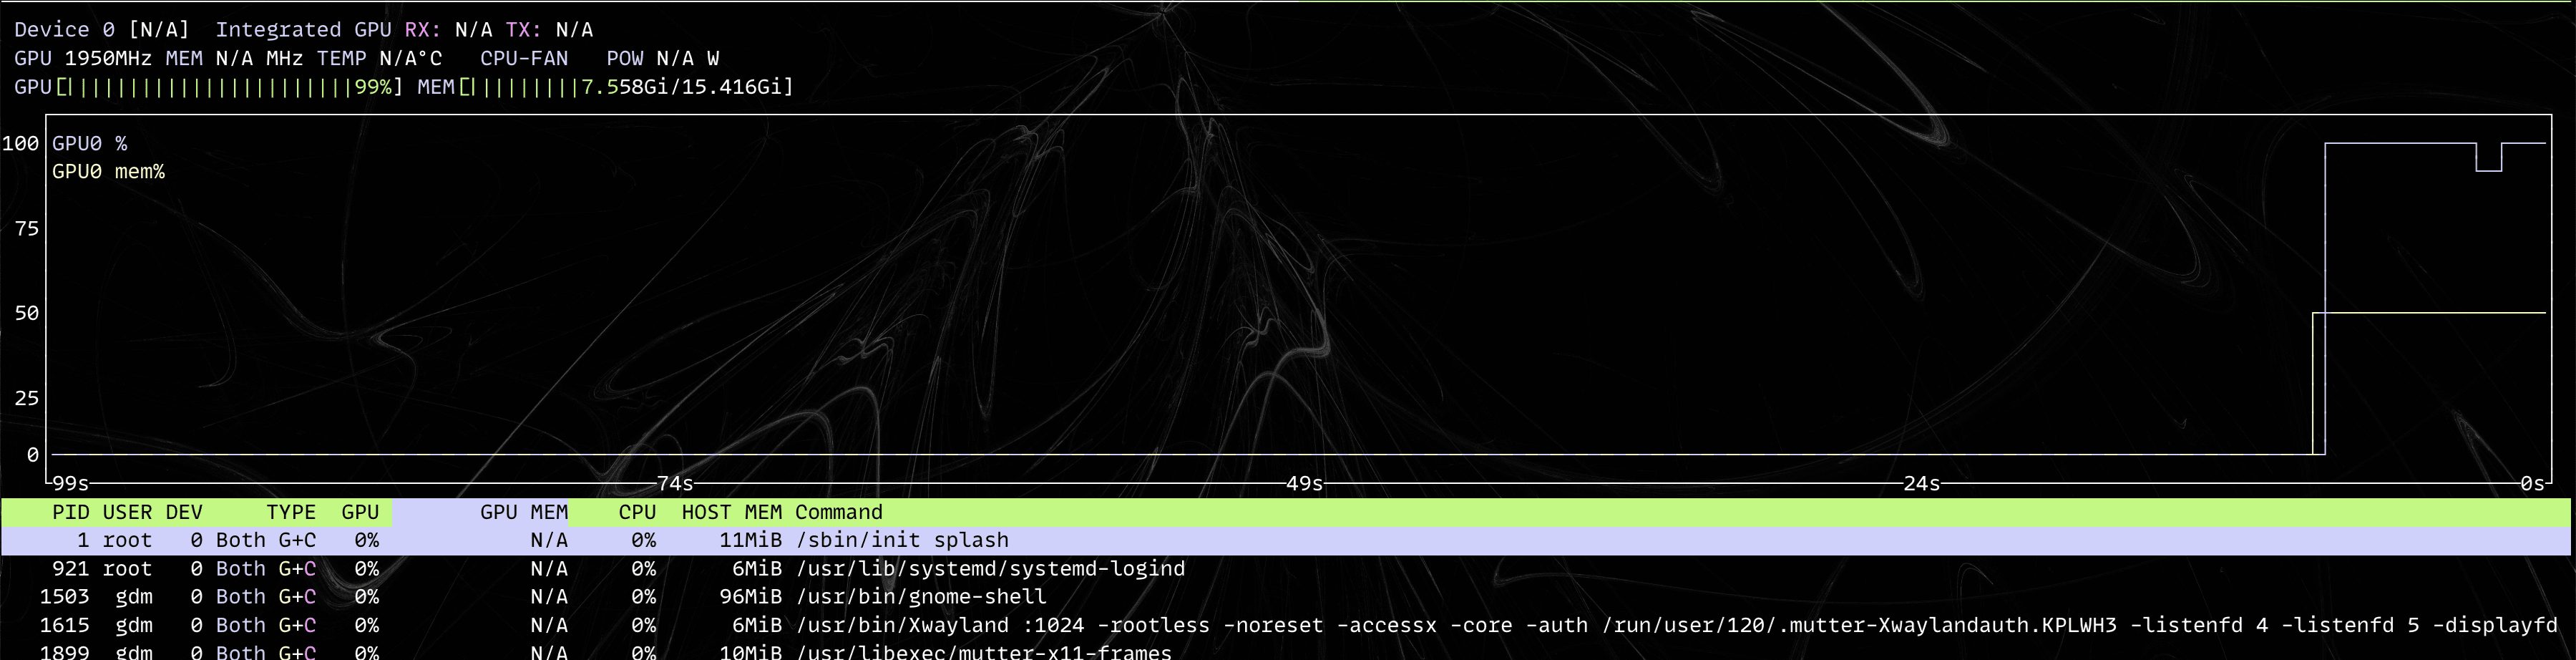
A shot of nvtop. It looks like we have some VRAM to spare!
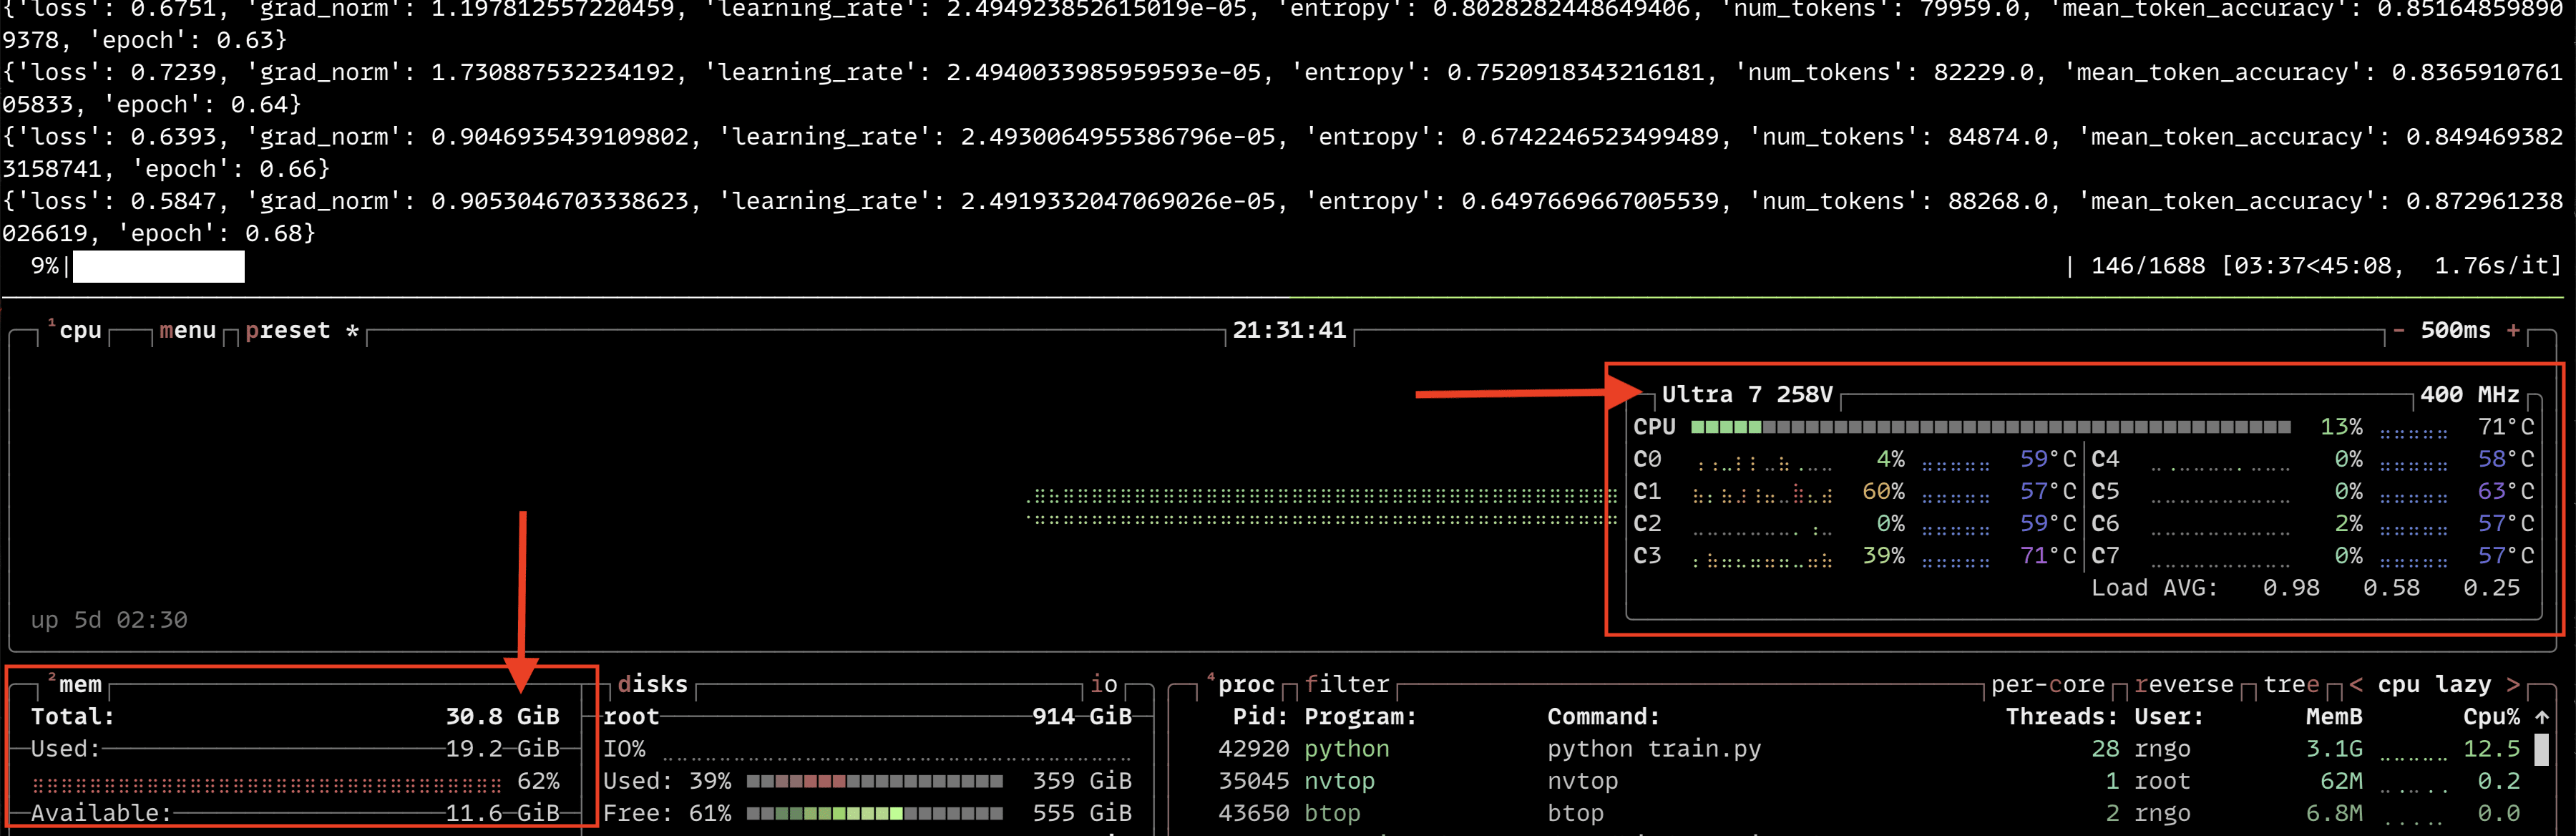
The following btop screenshot during training also shows that we're not using much CPU. Most of the RAM being used is by the GPU:
Not bad! I can see myself learning more about AI as a newbie with this.
Here's a list of what we can do already:
- Perform inference with smaller language models (possibly up to 7B) unquantized, or with Q4 quantization, up to 24B dense on GPU
- Fine-tune small language models for specific tasks
- Use image generation
- Speech-to-text transcription
- And much more...
I'm very impressed.
Inference on the Arc 140V
Okay so we can fine-tune, but how fast can we inference? Is 0.6B good for instantaneous results if we create a web-app for our model? Let's measure the token generation rate.
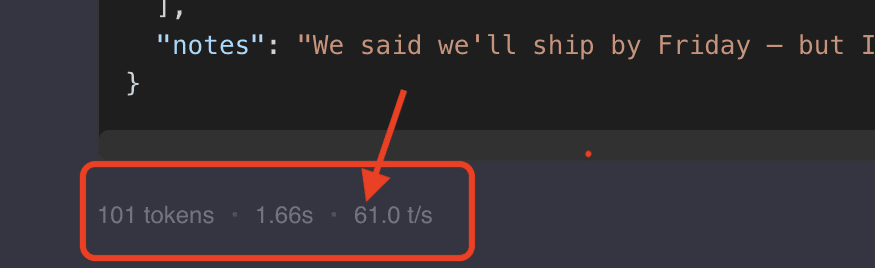
61.0 token/s. Of course, not as fast as the B580, but it is respectably fast and the model is pretty useful. It feels like it would be pretty close to real-time. This would be great to deploy on a mini PC. 😎
BONUS: CPU INFERENCING
By now, you're probably wondering why I mentioned llama.cpp earlier in this post. So far, we haven't used it yet. But I want to show you something!
Our model is so small, that we can get really fast generation speeds even if performing CPU inferencing on our little Lunar Lake platform. The settings used here was:
-ngl 0 \
-c 16384 \
-t 6
For 0 layers on the GPU, context window of 16K tokens and 6 CPU threads, the Lunar Lake (Core Ultra 7 258V) can push out 41.5 tokens/s!

Knowing this is really handy if you would like to save some GPU VRAM for another model. 😊
A final table showing the generation speeds of the Arc 140V and B580:
| Hardware | Config | tokens/s |
| Arc 140V | tp=1 | 61.0 |
| Core Ultra 7 258V | - | 41.5 |
| Arc B580 | tp=1, dp=2 | 134.0 |
Conclusion
I continue to be impressed at what a lower-cost option like Intel GPUs provides in inference and training over the more "luxury" option that NVIDIA offers when it comes to AI development. It's underrated, and thinking harder about this, the platform is more flexible.
We took Qwen3-0.6B from 54.35% to 86.97% accuracy on our JSON-fixing task—with a ~1,000-example dataset and a single Arc B580. And we proved it's possible to fine-tune on a mini PC with an Arc 140V, making this an accessible entry point for anyone curious about AI.
For the consumer on a budget needing to dabble in AI development, it's truly a platform that can scale from inference and fine-tuning on mini PCs to bigger desktops.
You can find all the code for this post here: urbanspr1nter/intel-gpu-fine-tune: Fine tuning example of Qwen3-0.6B on an Intel GPU using xpu
This concludes my adventure in exploring Intel Arc for AI for now. Unless, you know, Intel somehow reads this and sends me a Project Battlematrix unit to test. 😂 I'll give it back. I promise.